Re-flashing the controller
In some cases it may be desirable to obtain a clean installation on the controller. However this is only possible by opening up the controller and because of this it should be avoided if possible. See the article about Opening/closing the controller.
Obtaining the image and the required tools
T.B.D.
Booting from the USB interface
To re-flash the controller, a couple of things are required:
- The M12 connector must be configured for USB and not RS232. The RS232 configuration is very uncommon so this should generally be the case.
- A USB cable to connect to the M12 connector.
- Something to short the boot selection pins, generally a pair of fine metal tweezers is nice for this.
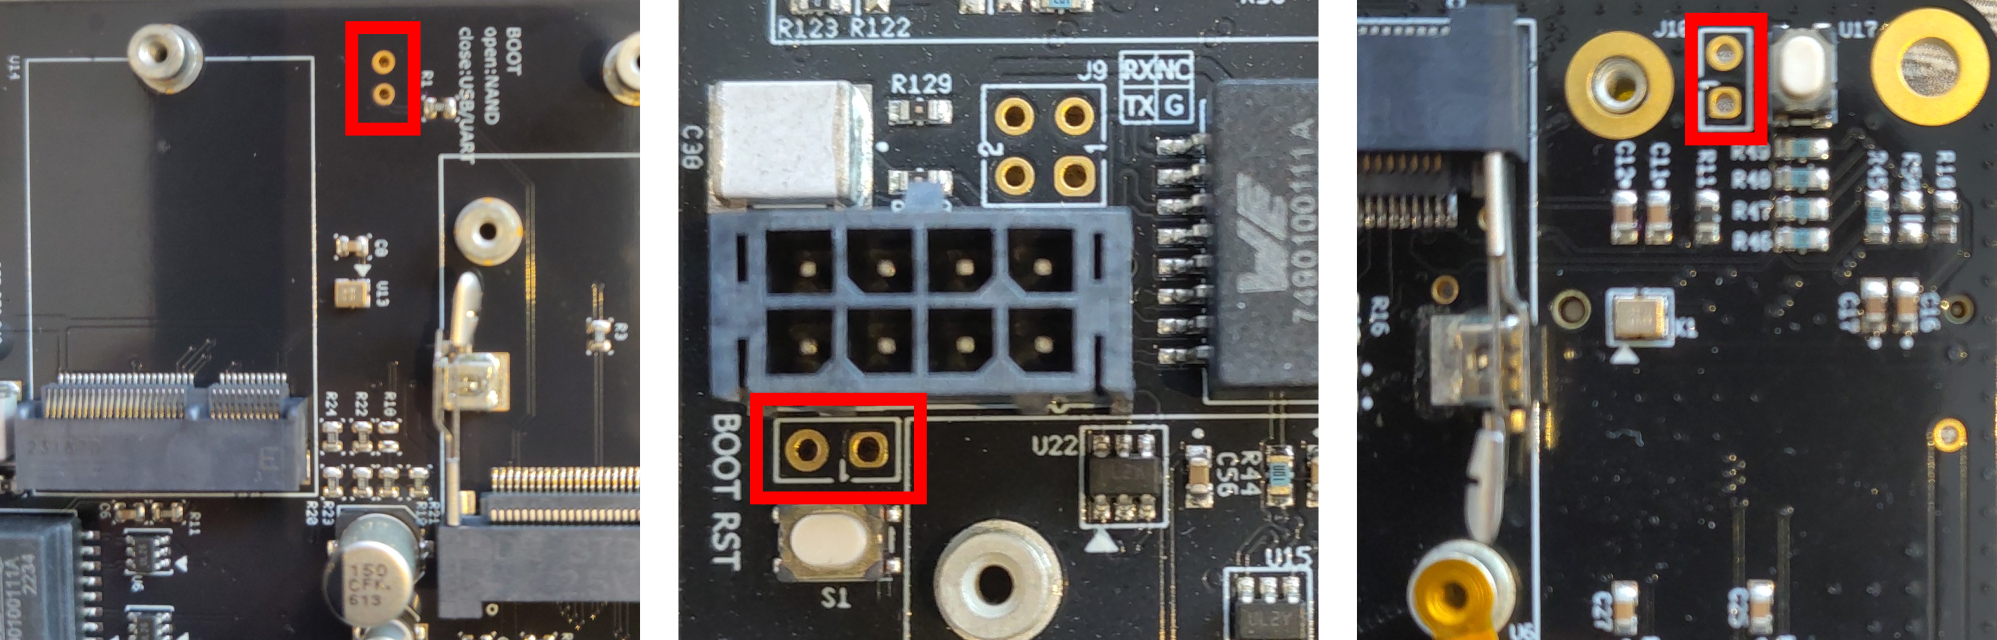
Next up is identifying the boot selection pins, it consists of two vias (small holes) that need to be connected together.
On the Moduline L4 they are marked with a bit of text inbetween the compute module and the Wi-Fi module.
On the Moduline M1 they are marked with “BOOT” they are in between the reset button and the connector that goes to the M12 connectors.
On the Moduline HMI1 they are not explicitly marked but there is a white outline around them, it is right next to the reset button.
When the controller is powered up with these pins shorted it will show up as a USB device pretty much instantly.
Note: K15 must be continuously applied during this process, the controller does not yet keep itself alive at this point.
Flashing the controller
When the USB device pops up the bootloader can be flashed over USB, which will then enable flashing of the eMMC. There are a couple of tools that can handle this initial flashing procedure. For Debian 11 images NXPs mfgtools/uuu is used in combination with the u-boot bootloader, For Debian 13 the imx-usb-loader from the barebox project is used together with the barebox bootloader. When the bootloader is running it will change into a different USB device which implements the android fastboot protocol which can then be used to finish flashing eMMC.
When using the barebox bootloader it will also create a USB serial device which can be used to directly configure things in the bootloader, however this is not a good interface for debugging, for that see the article on the debug port.
For flashing a ‘factory’ image all the tools and scripts will be included in the package downloaded in the “Obtaining the image and the required tools” step, this will automatically take care of this flashing procedure.
Flashing a Debian 11 image
Windows:
1. Navigate to where the files where extracted to in explorer, right click the empty space and select “open in terminal”.
2. In the terminal run .\uuu.exe uuu_###.auto, replace ### to match the proper file for your controller.
3. Wait for the flashing to finish, turn off the controller and then remove object bridging the boot select pins.
4. Re-apply power and the system will boot into the clean install proceed to “post-install” step.
Linux:
1. Try the included uuu binary or obtain it from your package manager or from the project itself. Search for both uuu or mfgtools.
2. Set up your udev rules so you don’t have to use sudo, run uuu -udev to see how.
2. Navigate to where the files where extracted in your terminal emulator of choice.
3. In the terminal run uuu uuu_###.auto, replace ### to match the proper file for your controller.
4. Wait for the flashing to finish, turn off the controller and then remove the object bridging the boot select pins.
5. Re-apply power and the system will boot into the clean install proceed to “post-install” step.
Post-install:
1. Connect the controller to the internet, easiest way at this point is to use an ethernet cable as some things are not working yet at this point.
2. Connect to the controller via ssh or the USB serial terminal (see the connecting articles).
3. Wait for the time to synchronize (use the date command to check the local time).
4. Make sure you are the root user, if you are logged in as the GOcontroll user, use su -l to switch to it.
5. Run release=$(curl -s https://api.github.com/repos/GOcontroll/GOcontroll-Moduline/releases/latest | grep -oP '"tag_name": "\K(.*)(?=")') bash -c 'wget -O /tmp/install https://raw.githubusercontent.com/GOcontroll/GOcontroll-Moduline/$release/installer/gocontroll-first-install; bash /tmp/install $release'
6. After a little bit of time it may ask for the controllers serial number, enter it as it is labeled on the lid of the controller, ex: A4CG-B04D-A088-A001, then press enter. It will get rejected if it is an incorrect format. If you enter the serial number incorrectly you can fix it with the go-sn command later.
7. After this finishes it will ask to reboot, do so by using the reboot command. After this the installation is finished, check if you need to enable/disable any services and you’re good to go!
Flashing a Debian 13 image (experimental)
Windows:
Currently flashing from windows is not yet supported
Linux:
1. There are two required executables for the script, imx-usb-loader and fastboot, there is a binary for imx-usb-loader but fastboot must be sourced separately.
2. Run the flash_display.sh script for the Moduline HMI1, flash_iv_306_d.sh for the Moduline L4 version 306 rev d and flash_mini_111.sh for the Moduline M1 version 1.11.
3. Wait for the flashing to finish, two commands will produce errors, these are expected as they break the communication, the controller will automatically boot into the flashed image, no restart required.
Post-install:
1. Make sure the controller is connected to the internet and the time is synchronized with the date command.
2. Put the postinstall.sh script on the controller with sftp and run it as the root user.
3. After a little bit of time it may ask for the controllers serial number, enter it as it is labeled on the lid of the controller, ex: A4CG-B04D-A088-A001, then press enter. It will get rejected if it is an incorrect format. If you enter the serial number incorrectly you can fix it with the go-sn command later.
4. Turn of the controller, remove power completely, remove the object bridging the boot select pins.
5. Re-apply power and the system will boot into the clean install, check if you need to enable/disable any services and you’re good to go!