Node-RED data logging
Node-RED is a web based application to create control flows and is by default installed on your GOcontroll Moduline controller. This article describes in a nutshell how to log data from modules which are installed into your controller. Be aware that this example is based on a specific hardware configuration. We assume you are already logged in to Node-RED. The example flow can be downloaded here:
Our goal is to log data from several channels on a 10 channel input module on slot 3 and a 6 channel input module on slot 4. We need to be able to start and stop logging from within our Node-RED environment. We want to have control over our file name. The output format needs to be .CSV and ultimately, we want to download the created log file from the controller.
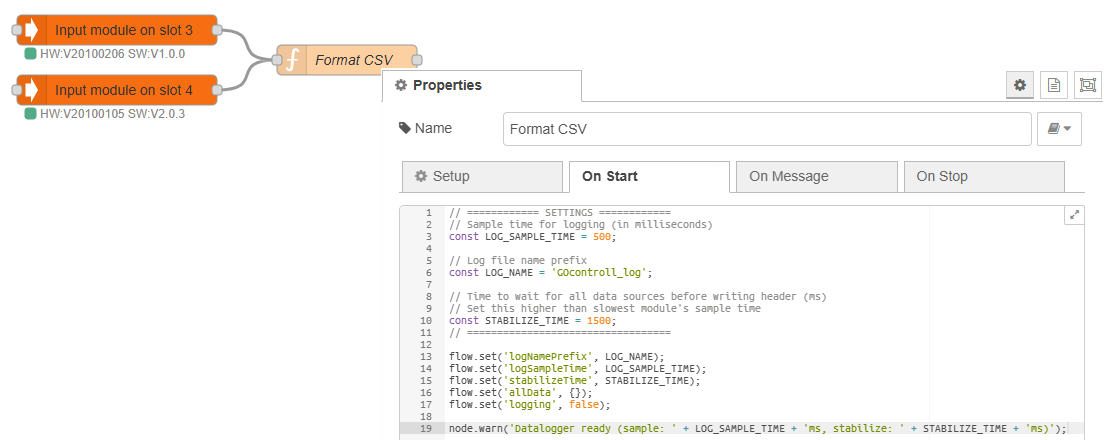
Step 1: Add the required nodes to Node-RED canvas:
We scroll down to the GOcontroll nodes and drag and drop one 6 channel input module and 10 channel input modules to the canvas. By double clicking each node, we can select the module slot and other configurations that are required for your project. When the modules are configured click on deploy and a hardware and software version for each module should appear. If not, check if your selected slots align with your controller configuration. (HW and SW versions can differ in your controller setup)

Step 2: Merge data from two flows
Both modules will initiate a flow but we want to have only one line with signals and timestamp in our .CSV file. The data from each flow needs to be combined. The function node called Format CSV in the example flow, can be used as inspiration. This node has several tab’s on of them is On Start. Here you can define a few log settings.
- LOG_SAMPLE_TIME. This defines the period time – frequency, data is logged to your .CSV file. The frequency is limited by the fastest sampling node attached to your function node. Keep in mind, Node-RED is flow based so the function node is only executed when data is injected.
- LOG_NAME To create a meaningful .CSV related to your project.
- STABALIZE_TIME This is the time, all connected modules have send the data at least once. Because the modules can have different sample times, the logger first has to receive all the signals to define the header (column names) of the .CSV file. Choose a value that is higher than the slowest module. (Module with the highest sample time)
On Message will have the logic to create the filename based on time the log is started, the collection and merge from the different flows (in this example the two input modules) and the sample time mechanism to create a .CSV file without to much jitter. You can check On Message in the example flow attached to this article.
Step 3: Write data to .CSV file.
This is probably the easiest step. When the payload and file descriptor are build, the write file Node will do the rest. Simply adding this nod is sufficient.

Step 4: ON – OFF mechanism to start and stop logging.
To log an event, it is needed to manually start and stop the logging or logging is triggered on an event. in this example we show how you manually switch on and off logging (Inject true or false). We will set the logging state to the flow. context of Node-RED. The logging state can be picked up by the function node that handles the complete logging mechanism.

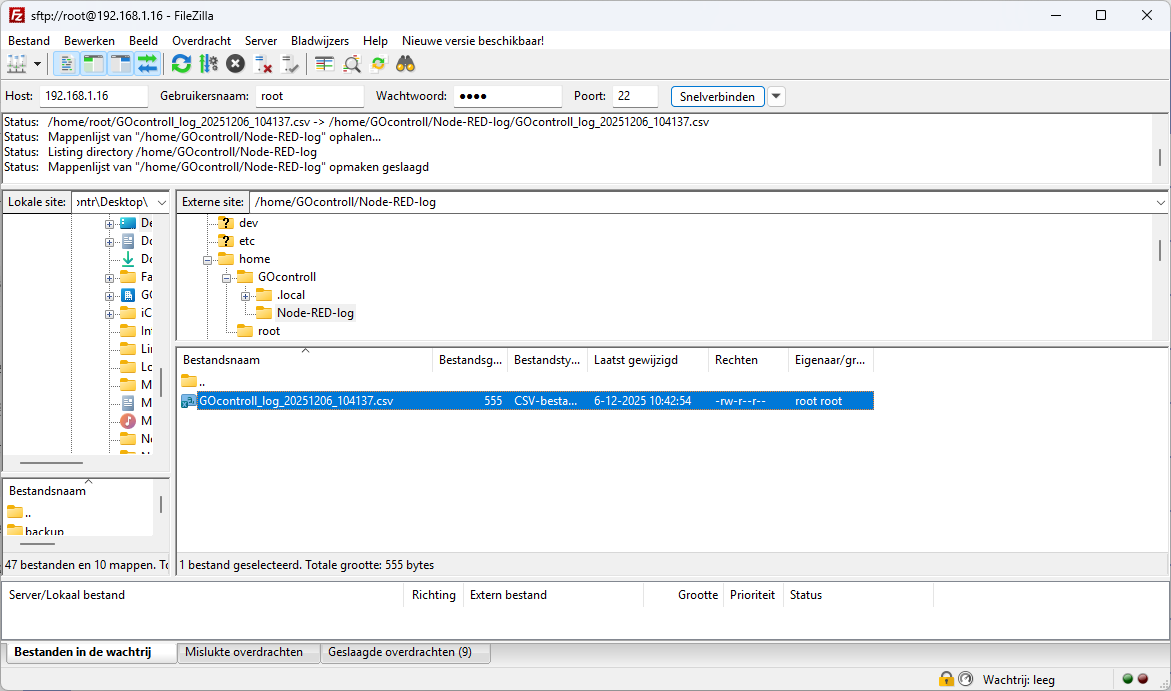
Step 5: Download your log file
The files, created by this example are stored on the controller in the folder:
/home/GOcontroll/Node-RED-log/The log files can be downloaded from your controller using FileZilla. Once you’re logged in, you can navigate to the folder and download the files.
Important notice when logging data.
Beside the fact our controller do have quit some eMMC memory, there are of course limits. When the memory on your controller becomes full, undefined behavior can occur and ultimately your controller can stop working which requires a complete re-install. When logging is automated, it is recommended to implement some sort of FIFO mechanism that automatically deletes old log files.