
4-20 mA Input Module
The 4-20 mA Input Module is a GOcontroll Moduline compatible expansion card designed to interface with passive sensors that use the 4-20 mA current loop standard.
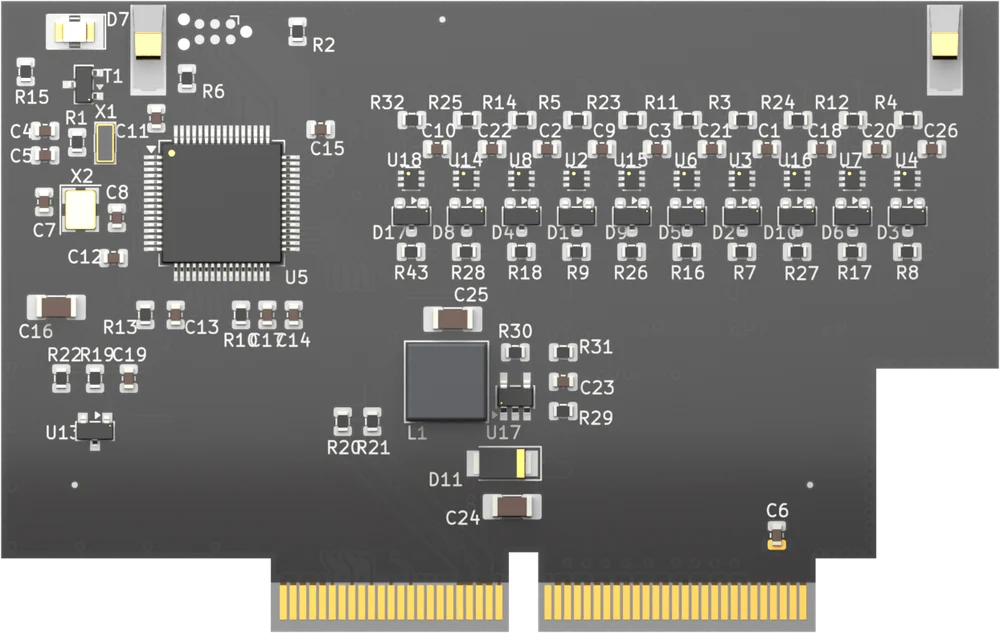
The module has ten current loop channels. Each channel powers the sensor in its loop from the module itself and measures the current that flows back, in microampere. The module fits every module slot of a Moduline L4, Moduline M1, Moduline S1 or Moduline HMI1. The article number is 201003 followed by two digits for the hardware version. For the electrical specifications see the product page.
On this page
- Channels and configuration
- Connections and pinout
- Programming with the CodeBase
- Programming with Simulink
- Programming with Node-RED
- Module status
- Module firmware
Channels and configuration
All ten channels do the same thing and there is no function to select. A channel returns the current in its loop in microampere, so a sensor at the bottom of its 4-20 mA range returns 4000 and at the top 20000. The measuring range runs to 25 mA, wider than the 4-20 mA band itself, so a sensor that runs outside its band stays visible instead of clipping at the top of the scale.
What you do configure is the sensor supply. The module carries five independent 16 V supplies, and each one feeds a pair of channels: 1 and 2, 3 and 4, 5 and 6, 7 and 8, and 9 and 10. Every supply is switched on or off on its own. Switch off the supplies of the channel pairs you have not wired, so that unused connector pins are not left sitting at 16 V.
The supplies are protected. When the module measures an overcurrent on one of them it switches that supply off and flags it in the status value it returns, listed under Module status.
Connections and pinout
The module presents the ten current loop inputs IN1 to IN10 and three ground pins. There is no separate supply pin, and that is where this module differs from the other input modules: here the input pin itself is the supply. IN1 to IN10 each provide 16 V to a passive two wire sensor, and the ground pins are the return of the current loop. Wiring it the way you would wire a 6 or 10 Channel Input Module, with the sensor powered from a supply pin and its signal going into INx, does not work here. Which connector pin carries which signal depends on the controller and on the slot.
If more ground connections are needed than the module has pins, the wires can be spliced.
Pinout Moduline L4
Eight module slots on 26-position connectors. Connector A carries slots 1 and 2, connector B slots 3 and 4, connector D slots 5 and 6, and connector E slots 7 and 8. The pin numbers are the same on all four. Slots 1, 3, 5 and 7 use the uneven layout, slots 2, 4, 6 and 8 the even one.
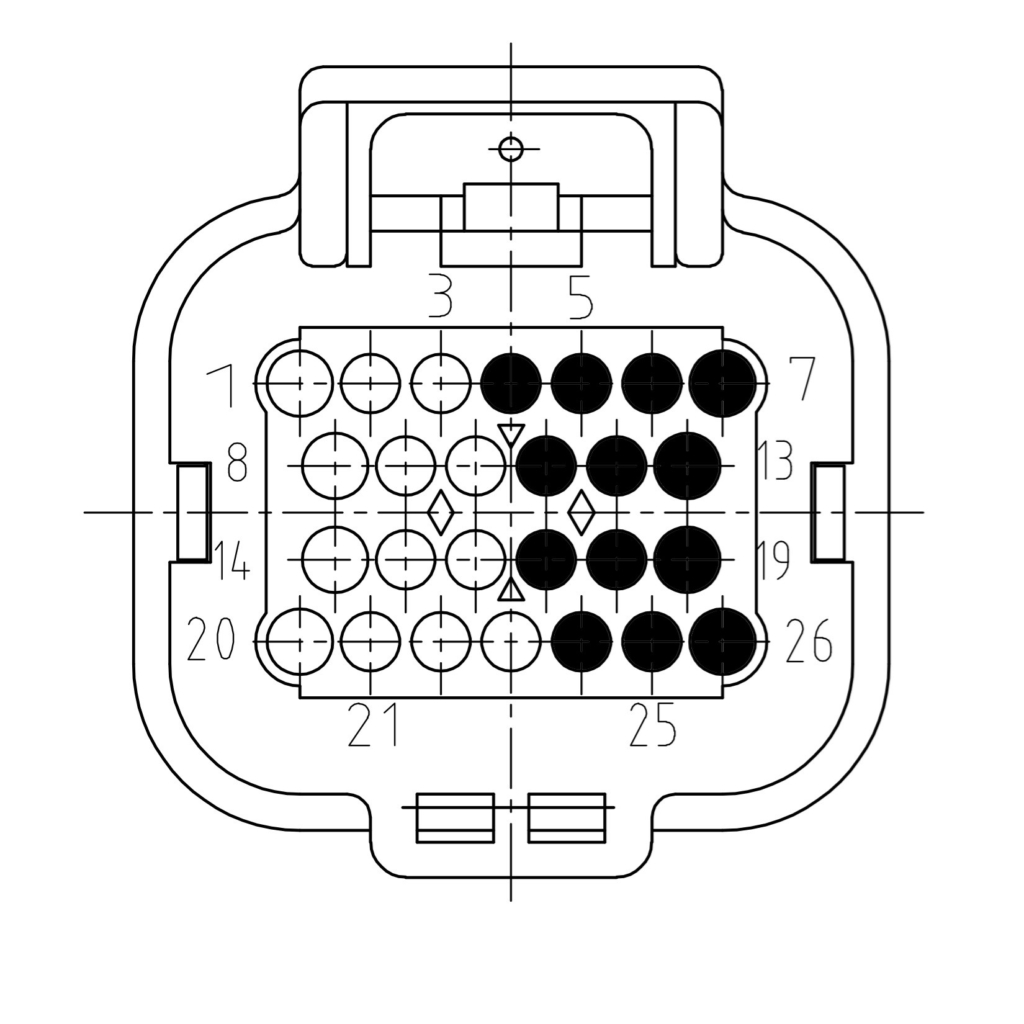
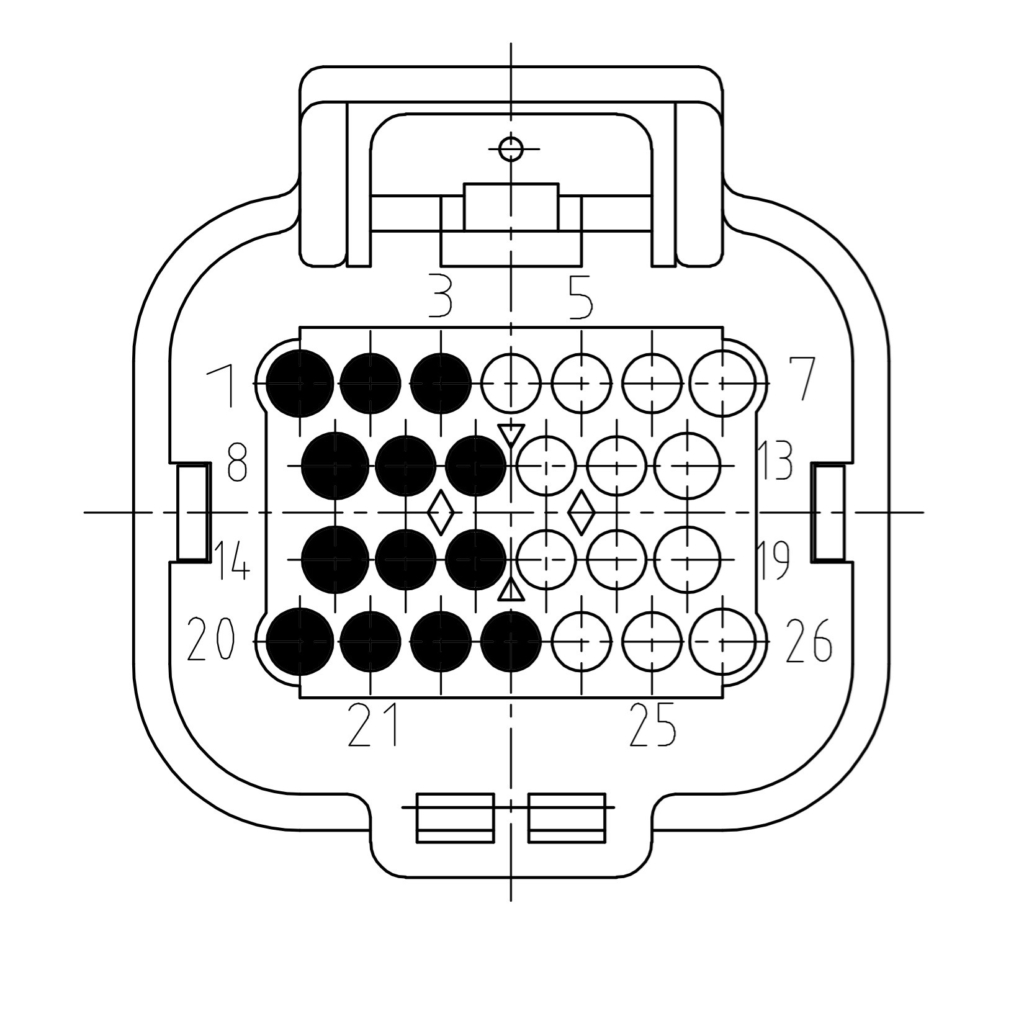
| Signal | Description | Uneven slot | Even slot |
|---|---|---|---|
| IN1 | Signal in 1 | 7 | 1 |
| IN2 | Signal in 2 | 13 | 8 |
| IN3 | Signal in 3 | 19 | 14 |
| IN4 | Signal in 4 | 6 | 2 |
| IN5 | Signal in 5 | 12 | 9 |
| IN6 | Signal in 6 | 18 | 15 |
| IN7 | Signal in 7 | 5 | 3 |
| IN8 | Signal in 8 | 11 | 10 |
| IN9 | Signal in 9 | 17 | 16 |
| IN10 | Signal in 10 | 4 | 23 |
| GROUND | Sensor ground | 26 | 20 |
| GROUND | Sensor ground | 25 | 21 |
| GROUND | Sensor ground | 24 | 22 |
Pinout Moduline M1
Four module slots on 34-position connectors. Connector A carries slots 1 and 2, connector B slots 3 and 4. The pin numbers are the same on both. Slots 1 and 3 use the uneven layout, slots 2 and 4 the even one.
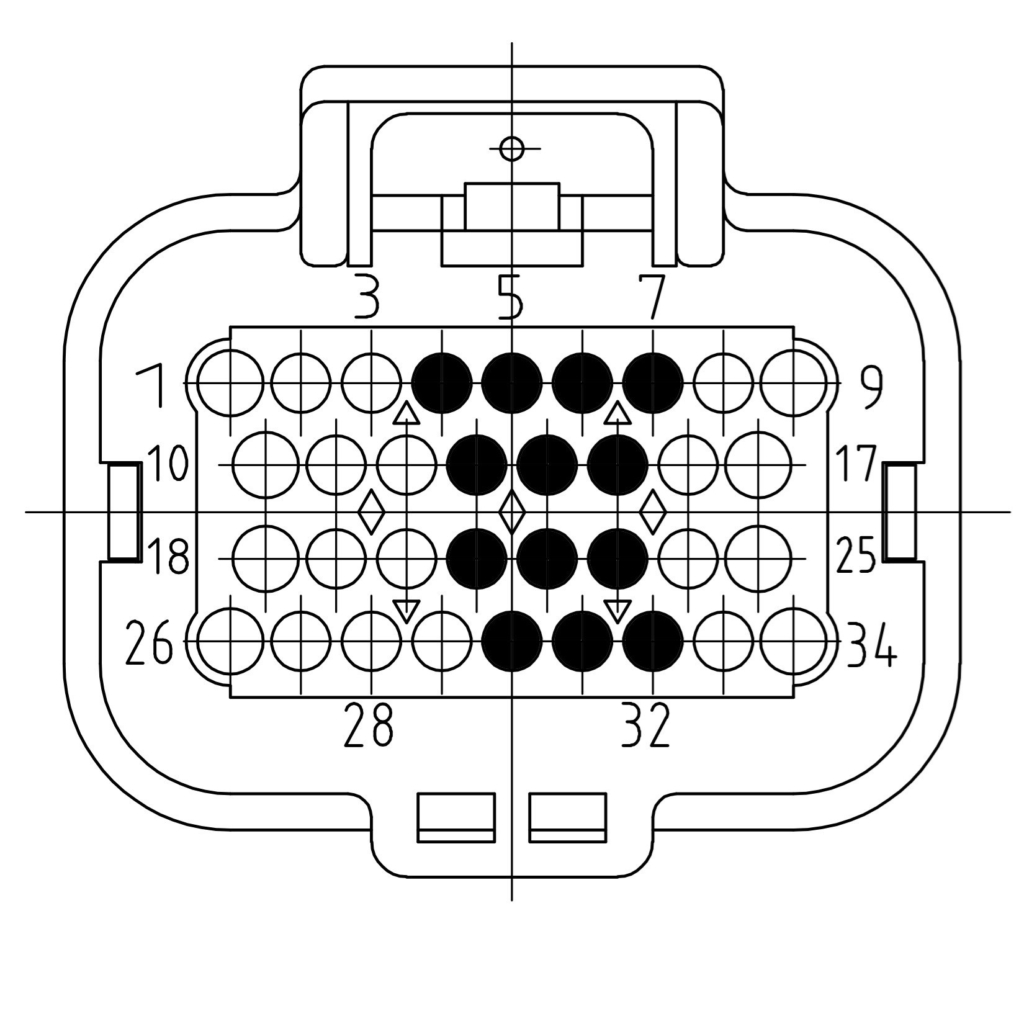
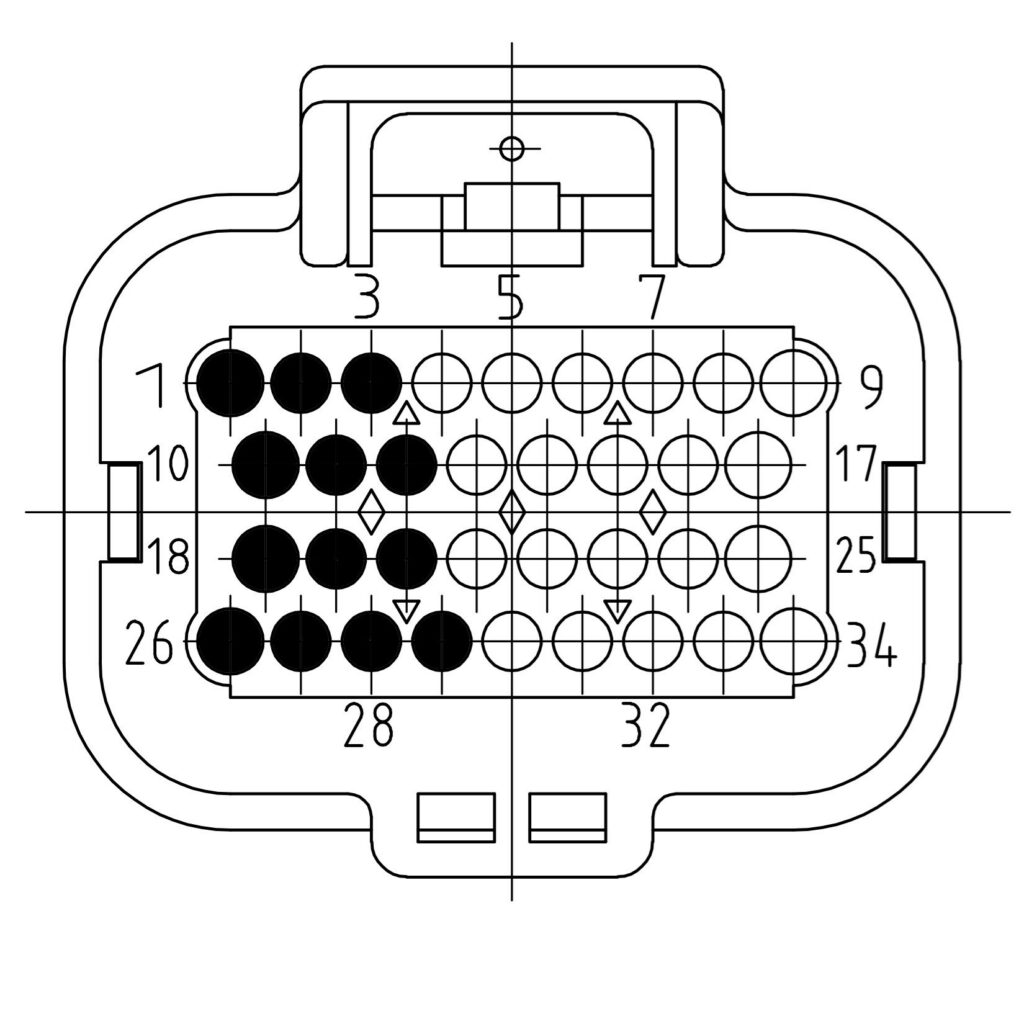
| Signal | Description | Uneven slot | Even slot |
|---|---|---|---|
| IN1 | Signal in 1 | 7 | 1 |
| IN2 | Signal in 2 | 15 | 10 |
| IN3 | Signal in 3 | 23 | 18 |
| IN4 | Signal in 4 | 6 | 2 |
| IN5 | Signal in 5 | 14 | 11 |
| IN6 | Signal in 6 | 22 | 19 |
| IN7 | Signal in 7 | 5 | 3 |
| IN8 | Signal in 8 | 13 | 12 |
| IN9 | Signal in 9 | 21 | 20 |
| IN10 | Signal in 10 | 4 | 29 |
| GROUND | Sensor ground | 32 | 26 |
| GROUND | Sensor ground | 31 | 27 |
| GROUND | Sensor ground | 30 | 28 |
Pinout Moduline S1
Two module slots on a single 34-position connector.
| Signal | Description | Slot 1 | Slot 2 |
|---|---|---|---|
| IN1 | Signal in 1 | 7 | 1 |
| IN2 | Signal in 2 | 15 | 10 |
| IN3 | Signal in 3 | 23 | 18 |
| IN4 | Signal in 4 | 6 | 2 |
| IN5 | Signal in 5 | 14 | 11 |
| IN6 | Signal in 6 | 22 | 19 |
| IN7 | Signal in 7 | 5 | 3 |
| IN8 | Signal in 8 | 13 | 12 |
| IN9 | Signal in 9 | 21 | 20 |
| IN10 | Signal in 10 | 4 | 29 |
| GROUND | Sensor ground | 32 | 26 |
| GROUND | Sensor ground | 31 | 27 |
| GROUND | Sensor ground | 30 | 28 |
Pinout Moduline HMI1
Two module slots on a single 34-position connector.
| Signal | Description | Slot 1 | Slot 2 |
|---|---|---|---|
| IN1 | Signal in 1 | 7 | 1 |
| IN2 | Signal in 2 | 15 | 10 |
| IN3 | Signal in 3 | 23 | 18 |
| IN4 | Signal in 4 | 6 | 2 |
| IN5 | Signal in 5 | 14 | 11 |
| IN6 | Signal in 6 | 22 | 19 |
| IN7 | Signal in 7 | 5 | 3 |
| IN8 | Signal in 8 | 13 | 12 |
| IN9 | Signal in 9 | 21 | 20 |
| IN10 | Signal in 10 | 4 | 29 |
| GROUND | Sensor ground | 32 | 26 |
| GROUND | Sensor ground | 31 | 27 |
| GROUND | Sensor ground | 30 | 28 |
Note: only one application may claim the modules. If a second program initialises the same module – most often a compiled Simulink model next to a Node-RED flow – it causes strange behaviour. Use the CodeBase, Simulink or Node-RED, not two of them at the same time.
Programming with the CodeBase
The GOcontroll CodeBase is the C library for writing your own program. The module is handled through GO_module_input_420ma.h and one _inputModule420ma instance, with two calls: one that sends the configuration and one that reads the values.
static _inputModule420ma inputModule420ma;

GO_board_get_hardware_version();

inputModule420ma.moduleSlot = MODULESLOT1;
GO_communication_modules_initialize(MODULESLOT1);

for (uint8_t ch = 0; ch < 10; ch++) {
    inputModule420ma.configuration[ch] = 1;
}

for (uint8_t i = 0; i < 5; i++) {
    inputModule420ma.supply16ch[i] = 1;
}

GO_module_input_420ma_configuration(&inputModule420ma);
This module has no set module type call and no channel configuration call of its own: you write the slot straight into the struct, and the configuration you send holds the ten channel bytes and the five sensor supply bytes, one per channel pair. A supply byte of 1 switches that supply on, 0 leaves it off.
Initialise the communication for the slot before you send the configuration. The configuration call checks that a module has been detected in that slot, and returns an error when the communication has not been initialised yet.
Reading the module is one call in your application loop, which also brings the module status back:
GO_module_input_420ma_receive_values(&inputModule420ma);

/* inputModule420ma.value[0] .. value[9] hold channel 1 .. 10 in microampere,
   inputModule420ma.status holds the sensor supply faults */
The complete example is in examples/input_module_420ma/ of the CodeBase; it reads the module in a 10 ms loop and converts the microampere reading to a percentage of the 4-20 mA range.
Programming with Simulink
The GOcontroll blockset for MATLAB Simulink holds the block Input Module 4-20 mA (10 channel), in the Modules group of the library browser. See using the blockset and create model to get started.
The block has no inputs and eleven outputs: the module status as a uint8, followed by the ten channels as uint16, each in microampere. The output labels show the connector pin that belongs to the controller type and slot you selected, so you can trace a sensor from the model back to the wiring.
Its mask holds the sample time, the controller type and the module slot, and a switch for each of the five sensor supplies. There is no separate monitor block for this module: the status is the first output of the block itself.
Programming with Node-RED
The GOcontroll nodes are installed on the controller by default. The node for this module is 4-20mA Mod, in the GOcontroll section of the palette. See first flow for building a flow.
Note: the Moduline S1 does not run Node-RED.
In the node you set the module slot, the sample time (1 s, 200 ms, 100 ms or 50 ms) and the five sensor supplies. Each channel also gets a signal key: the name it carries in the output message. The defaults are inputSignal1 to inputSignal10; use a descriptive name, it makes the rest of the flow readable.
The node has no input. Every sample period it sends one message holding the ten keys with their values in microampere, and the state of the five sensor supplies:
{"inputSignal1": 6000,
 "inputSignal2": 8000,
 "inputSignal3": 7000,
 ...
 "status": {"supply1": 0,
            "supply2": 0,
            "supply3": 0,
            "supply4": 0,
            "supply5": 0}}
A supply that is in order reports 0, and a supply the module has switched off reports 1.
The Object I/O (legacy shape) checkbox determines where those keys end up. Enabled, they sit directly on the message. Disabled, they sit in msg.payload, which is the Node-RED convention.
The node shows the article number and the firmware version of the module as its status. If the slot holds a different module type, the status turns red and reports that the selected module does not match the module present in this slot.
Module status
The status value the module returns is an 8 bit field in which every bit that is set stands for one fault. Each bit belongs to one of the five sensor supplies, and every supply feeds two channels: when the module measures an overcurrent on a supply it switches that supply off and sets its bit. A bit that is not in the table below is reserved.
| Bit | Fault |
|---|---|
| 0 | Overcurrent on the sensor supply of channels 1 and 2 |
| 1 | Overcurrent on the sensor supply of channels 3 and 4 |
| 2 | Overcurrent on the sensor supply of channels 5 and 6 |
| 3 | Overcurrent on the sensor supply of channels 7 and 8 |
| 4 | Overcurrent on the sensor supply of channels 9 and 10 |
Module firmware
The module runs its own firmware, which drives the sensor supplies according to the configuration your application sends and measures the current in each loop. Use go-modules to check the installed version and to update it, and identify to list the modules the controller detects.
Also see
- 10 Channel Input Module – ten voltage inputs on a fixed 0 – 5 V range, with a function to select per channel
- Hot plugging – removing and inserting a module
- go-modules – reading out and updating module firmware
- 4-20 mA Input Module product page – specifications and ordering